


How to make a tape
template?
Below section shows
you how to make a (mould) template and how to take hair sample(S) from your
head, hope this helps and make your ordering easy and convenient to handle.
Supplying
a template of your hair loss area is a fundamental part of ordering a
bespoke hair replacement system. The template will be used as a model
from which we will derive the correct size and shape of your hair loss
area. This will ensure we make a system that is a perfect fit for you.
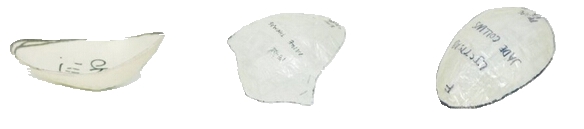
Here below is an example of template moulds:
Making A Tape Template:
Items required
· Plastic wrap
· A roll of transparent
tape
· Make up pencil
· A permanent marker pen
· Scissors
· Hand mirror
|
|
Step 1 |
Draw your hairline
with a make up pencil on your skin from temple to temple. If you will be
using tape at the front of your new system, use the same shape tape as a
stencil for this line. For most, the
placement of the hairline is established by placing three or four fingers
flat on the forehead with the pinkie resting above the eyebrow line when your
brow is furrowed (eyebrows raised), where your index finger lies is where
your front hairline should begin. Draw a line from this point to form your
hairline. A hairline with a deeper recession looks the most natural rather
than one that is too straight across. The deeper the recession the more
natural look is obtained. Be careful not to place your hairline too far down.
Use rubbing alcohol to erase the line if you need to try again. |
|
|
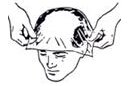
Step 2 |
The first thing you
need to do is spray some water on your scalp, this will help you with the
next step. Next, tear a 12” wide strip of plastic wrap long enough to tie
under your chin (like a bonnet). Now place the wrap on your head and press
the wrap tightly to your head and tie it under your chin in order to keep
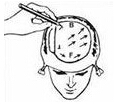
wrap secure. Next use the tape to contour the head shape. Beginning at the
forehead, place the transparent tape on the wrap over what will become the
outer perimeters of the bald area pattern. The outer perimeters are
determined by the areas of baldness. |
|
|
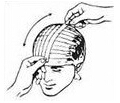
Step 3
|
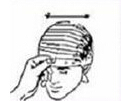
In this next step
the tape will lock the plastic wrap into a permanent transparent tape
template of your scalp. Apply three layers of tape. Begin with the first
layer going from front to back then over lap the second layer going side to
side and the final layer should be front to back again. PLEASE DO NOT UNTIE
PLASTIC WRAP FROM UNDER THE CHIN UNTIL THE LAST STEP IS FINISHED. |
|
|
Step 4 |
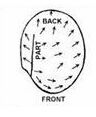
While plastic wrap
is still on your head, trace/draw pattern hairlines on the tape template with
a permanent sharpie marker. Lines are drawn from that point (center of front
hairline you drawn in Step 1) to form a pattern which covers the bald area.
This pattern will establish the shape of your hair system base. After the entire
outer perimeter of the pattern is drawn, the desired hair direction should be
indicated. If a parting is desired, draw a line from a pivot point at back
crown to the front hairline. Placement of the pivot point should correspond
to what can be seen of your original growth. After the entire
outer perimeter is drawn, please indicate the front by marking “F” for front
and “B” for back on the template. Also write your name and order number on
this template. |
|
|
Step 5 |
Upon finishing
marking the tape template, place one more layer of the transparent tape (now
four) going from side to side. This should seal and protect the markings. Now
your template is complete. |
|
|
Step 6 |
Carefully untie and
remove the template from your head and cut with a scissors the excess plastic
wrap along the outer perimeter line you drawn. A wonderful tape template is
coming out, place it back on the bald area of your head to ensure it's the
correct size and shape and you're done! Just go and send it to us together
with your hair sample (we will show you how to make hair samples separately). |

Taking Hair Sample(S):
If we obtain
your hair samples, we are able to dye the hair color to match your samples
very well. Colour is hard to be described with words or with a photo as you know.
So sending in a REAL sample ( or samples, your hair may have different color
shade in different area of your head, or even the color on tip has difference
to the color on root) can ensure us to make out a hair system that match your
existing hair precisely.
For best results, we
recommend taking each sample in 100-200 strands of hairs and be about 2-3"
in length. The more hair you can provide, the easier it will be for us to
analyze the color.
.
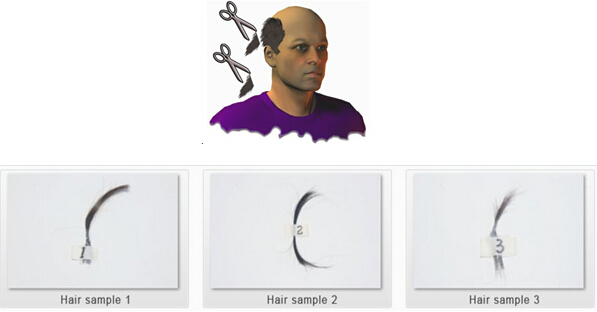
If your hair is the
same color all over, please just provide one sample. However, if your hair is a
different color in different areas (e.g. you have more grey in the sides), For
best results, please take samples from 3-6 areas:
-Front: At the
hairline or bang area (if possible)
-Top: The front, top
of your head (if possible)
-Crown: The back, top
of your head (if possible)
-Temples: At the front
most part of your hair on the sides
-Sides: Approximately
1-2" above the top of your ear
-Back: As close to the
center of the back of your head as possible
NOTE: Please cut a sample from each area and label each one,
informing us what part of the head it came from (e.g. front, top, sides, crown,
temple or back etc.).Please make sure the hair is clean. This is important
because dirty hair will not show its true color.
We
strongly recommend sending in your hair samples because the photos are not able
to reflect the real color of your hair, besides, our computer monitors may also
not display the color in its original actual tone. There always has color
difference.
China mainland factory in Qingdao:
Company name:Qingdao Global Touch Hair Co.,Ltd
Adress:Daguhe industrial park,Huangjiatun,Ligezhuang Town,Jiaozhou city,Qingdao,266316China
Zip code:266316
Contact name:Zhang Yi Lin
Tel:86-18561874820

